
End-User Projects
What we call End-User Projects are typically web applications. This means that only a single version is ever in production at a time, and each of these goes through customer UAT before being deployed into production. Therefore, we needed the ability to promote the code through various quality stages. But given the complexity of some of the applications, we also wanted to incorporate feature branching. This was accomplished using the following model (click on the image for a larger view):
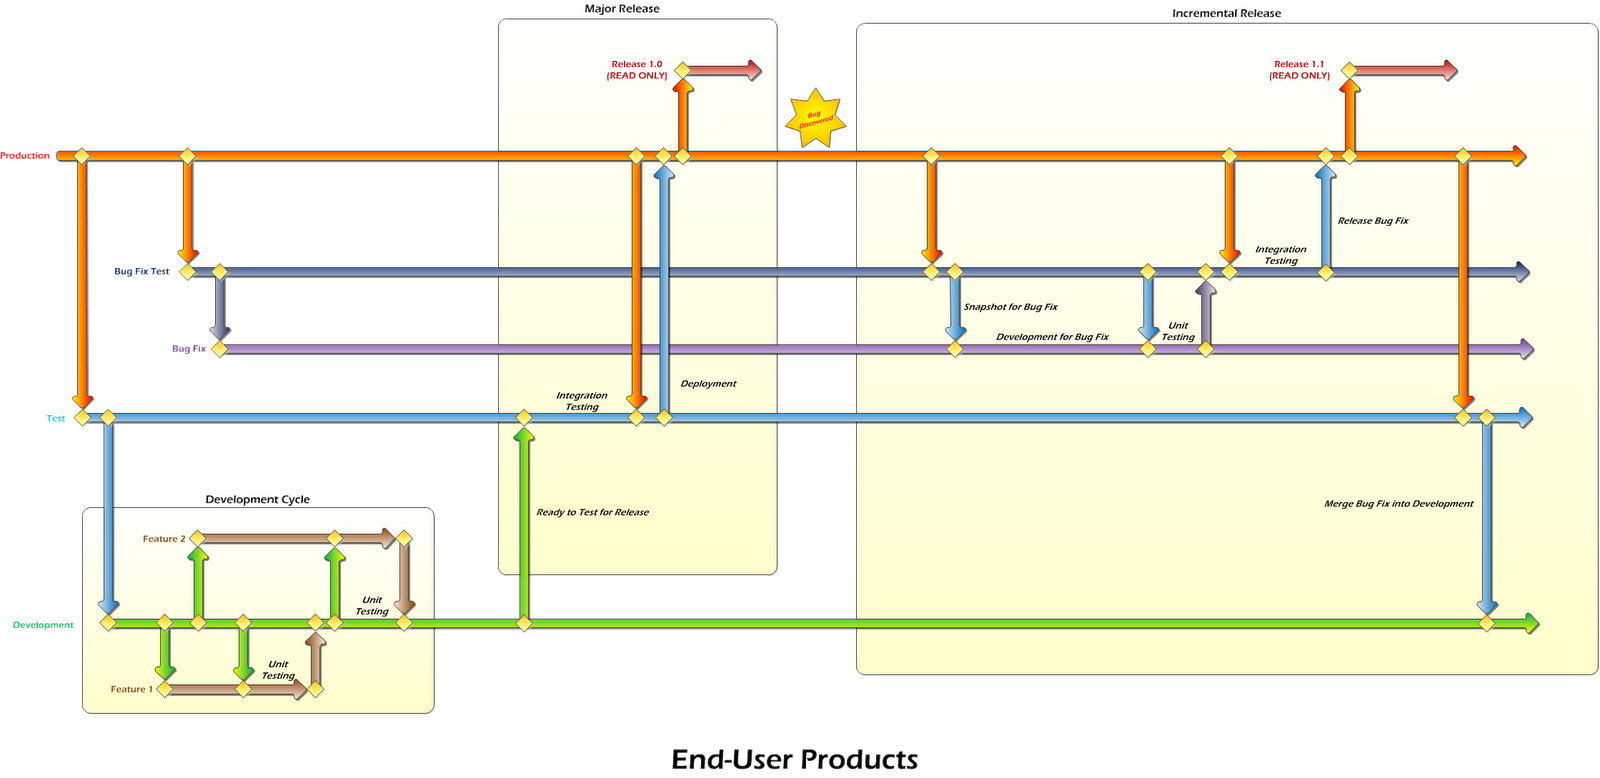
This pattern consists of 5 primary branches:
- Production - this is the top of the hierarchy, as all branches are child branches or below of this one. The code in here represents "production ready" code which is ready to be deployed. Typically code in the Production branch is released immediately after merging into this branch.
- Test - the Test branch represents release testing, meaning code testing prior to its release. This is to be distinguished from testing bug fixes to code that is already in production.
- Development - this is the main branch, and where almost all development occurs. It contains the latest code with the most up-to-date feature set.
- Bug Fix Test - this branch is used for testing bug fix releases. Normal deployments from Development to Production will never pass through this branch.
- Bug Fix - the Bug Fix branch is the development branch for coding bug fixes. This has to be distinctly different from the Development branch because new code in the Development branch shouldn't be merged into production along with a bug fix. Without this branch (and Bug Fix Test), there would need to be a code freeze while fixing bugs, and that's a cardinal no-no in the world of branching.
In addition to the above five branches, there are individual feature branches off the Development branch. There is also an individual read-only branch for each release, which are branched off the Production branch.
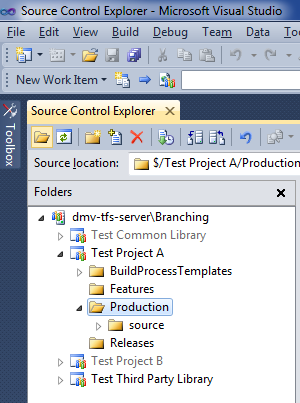
In order to create this pattern in TFS, we first create the folder structure. The structure is similar to what was in Part II, with the addition of a Features folder. It should look like this when completed:
Once the basic folder structure is created, it's time to create the branches.
- First, convert the Production folder to a branch.
- Branch the Production branch into a Test branch and place it in the root folder.
- Branch Test into a Development branch and place it in the root folder.
- Branch Production into a Bug Fix Test branch and place it in the root folder.
- Branch Bug Fix Test into a Bug Fix branch and place it in the root folder.
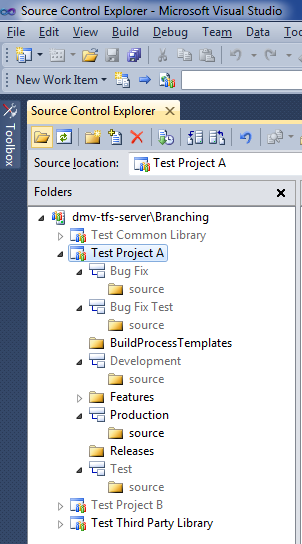
When you're done, it should look like this:
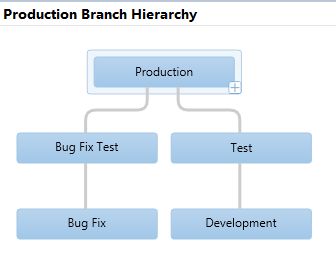
The branch hierarchy should look as follows (you can view this by right-clicking on the Production branch, going to "Branching and Merging" and choosing "View Hierarchy"):
Finally, check in your project code into the "source" folder of the Development branch. This can simply be an empty project at this point.
Now that the basic branch structure is all set up, I'll go through a typical development process including feature development, testing, deployment, and bug fixes. Let's start with the development cycle, which is entirely contained to the Development branch and its child Feature branches:
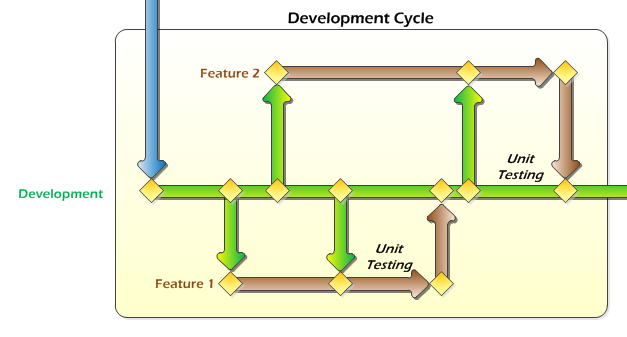
To create these branches:
- Branch Development into a "Feature 1" branch, located in the "Features" folder.
- Branch Development into a "Feature 2" branch, also in the "Features" folder.
It should look as follows:

Once all of the features have been completed, unit tested, and merged into the Development branch, it's time for a deployment.
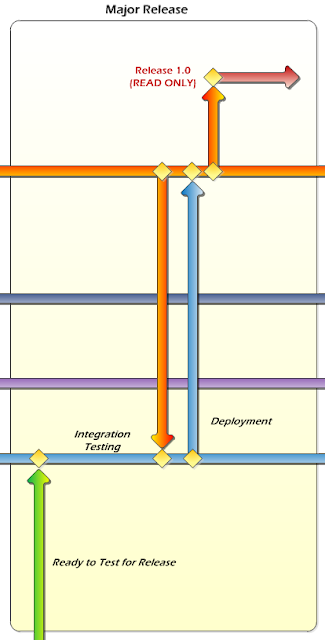
As you can see, the first step is to promote the code from Development to Test by merging the Development branch into the Test branch (and checking in the Test code afterward). After that, integration testing is performed on the code in the Test branch. Once that is done, merge code down from Production to Test, to make sure any potential conflicts are resolved. You might want to do additional testing at this point, too. After that, merge the code in the Test branch into Production (and check in). Finally, create a read-only branch from Production for the release. The process for doing this is the same as in Part II.
Now let's say after Release 1.0 has been deployed, we discover a bug in production that needs to be fixed right away and can't wait until the 2.0 release. No problem!
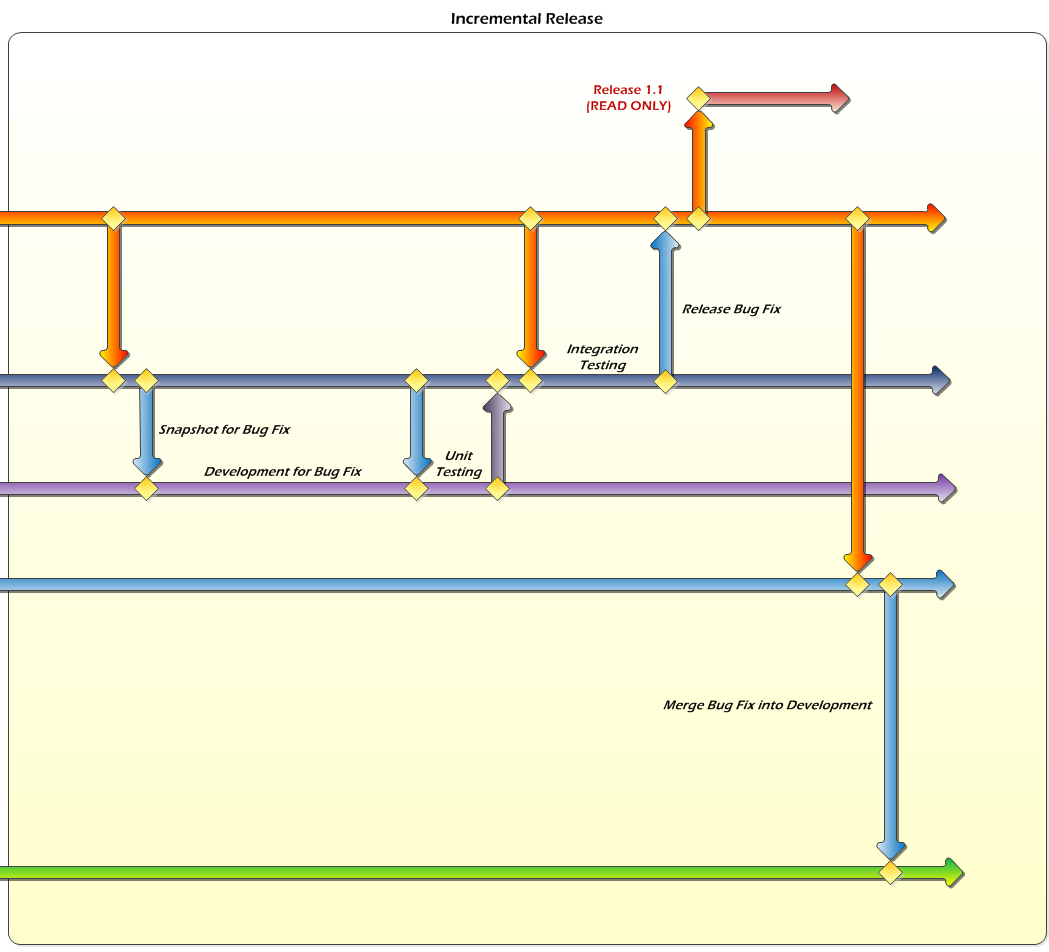
Here are the steps for creating an incremental bug fix release:
- Merge code from Production to Bug Fix Test.
- Check in Bug Fix Test code.
- Merge code from Bug Fix Test to Bug Fix.
- Check in Bug Fix code.
- Code the bug fix in the Bug Fix branch.
- Merge code from Bug Fix Test to Bug Fix prior to unit testing (in case any other bug fixes were going on at the same time).
- Unit test the bug fix code in Bug Fix.
- Merge code from Bug Fix to Bug Fix Test.
- Check in Bug Fix Test code.
- Merge code from Production to Bug Fix Test (in case any other bug fixes were deployed while this one was being worked on).
- Perform integration testing of the bug fix code in Bug Fix Text.
- Merge code from Bug Fix Test to Production.
- Check in Production code.
- Create a read-only branch from Production for the incremental release.
- Now we need to merge the bug fix into our mainline code. Merge the Production code into the Test branch.
- Check in Test code.
- Finally, merge the code from Test down into Development.
- And, of course, don't forget to check in the Development code.
That completes an overview of all the major tasks involved with End-User projects. In the next part, I'll cover the Internal project pattern.
No comments:
Post a Comment