
On our team, we have three main types of projects. The first is what we call End-User projects. These are web applications and we would only ever have one version running in production at any given time. These projects all require UAT testing by our customers. The second kind of project is what call Internal projects. These are never directly used by end-users, so they never go through UAT. Internal projects are usually things like common class libraries that are shared by several End-User projects. This means that several different versions of an Internal project could be in production at the same time. The third type of project we use are Third-Party projects. These are third-party libraries that we usually don't have the source code for, so they are simply versioned and stored. However, in some cases we will have the source code (open source libraries, jQuery scripts, etc.) and we will make customizations to them. Because of the different requirements for the three types of projects, we needed three different branching patterns.
Third-Party Projects
I'll cover the Third-Party branching pattern first. In our environment, we have two types of releases when it comes to third party libraries. What we call a third party release, which is simply what is released by the developers of the library and a customized release, which is where we make small custom modifications to the library (usually for jQuery libraries). We don't go through a formal testing phase for either of these, so we just need basic branching support for tracking the releases and allowing for customization. We achieve this by using a variation of the Branch by Release pattern (click the picture for a larger view).
In this pattern, all code is initially checked into the Enhancement branch, then released into individual read-only Release branches from there. Note that these "check ins" are actually complete replacements of the code. So the changeset would consist of a deletion of everything, then the addition of the new files. This can also be handled by two separate changesets. Note that before creating the Release branch, we label the code in the Enhancement branch. This will come in handy later, because we may have to rollback the code in order to enhance an older release.

If we want to customize something, we merge from the Release branch down to the Enhancement branch and make our changes there. Then we release it by creating a new Release branch for the customized version, and finally merge those changes back into our Main branch. Again, don't forget the labels.
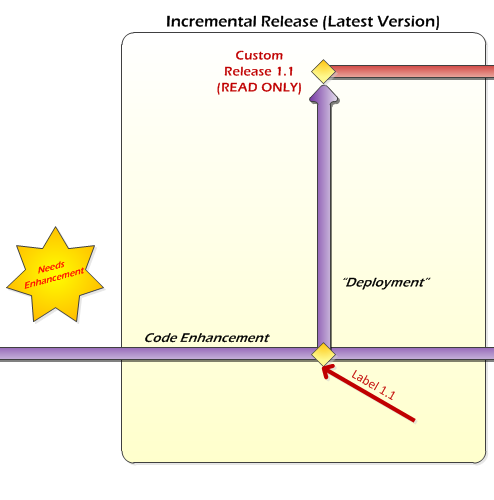
If we want to make an enhancement to an older Release (not the latest release), then we have to first rollback the Enhancement branch to the label for that version. Then we make our changes and release as normal, but when we're done we rollback the Enhancement branch back to the latest release version. This ensures that we always leave the Enhancement branch with the latest version.

The other case we have to handle is when we want to propagate enhancements we've made to a later release. First off, be careful when doing this because you never know what may have changed in third-part code from release-to-release. So automatically patching a later release isn't recommended. But assuming you've done your due diligence, this is how you do it.
First, you do your major release of the new version as before. Then you merge the previous release (which contains your enhancements) into the Enhancement branch. After you're satisfied that the result is working, create your new customized release branch. Don't forget to label everything.

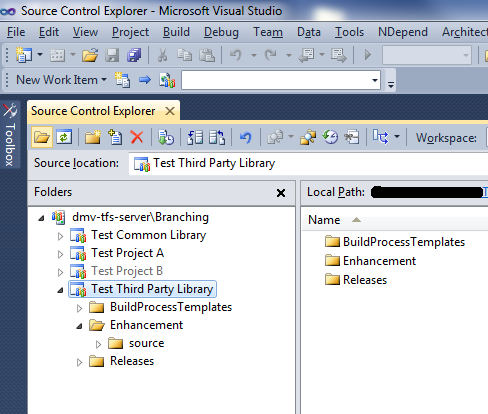
In order to create this in TFS 2010, first create the basic folder structure. The design of the folder structure can vary depending on your needs, but we tend to use something like below. Normally we would also have a "Features" folder, but that doesn't apply for this pattern. It will be used in the the later patterns, though.
Next, create your project and check it in to the source folder under Enhancement (or just check in the library assemblies). After that, convert the Enhancement folder to a branch. Do this by right-clicking on the folder, then going into the "Branching and Merging" menu.
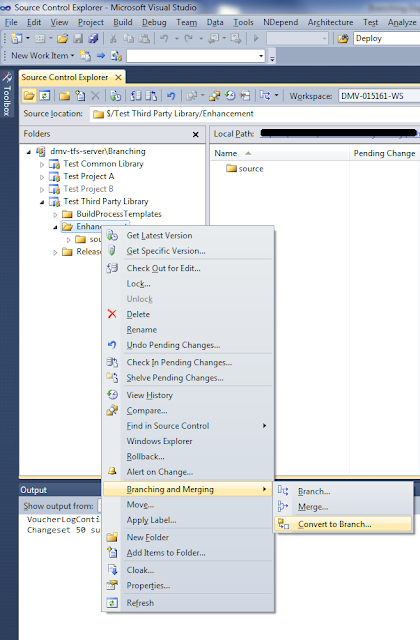
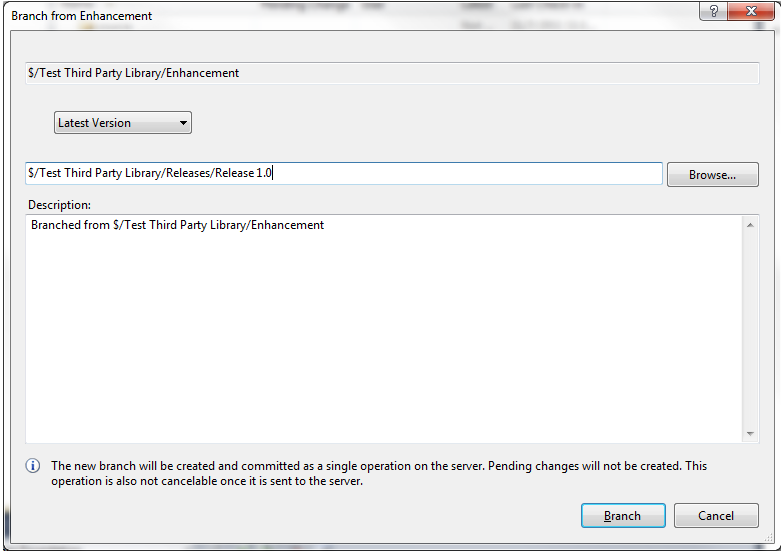
Finally, create a release from the Enhancement branch. Go to the same "Branching and Merging" menu by right-clicking on the Enhancement branch, and choose "Branch..." Fill out the dialog as shown below:
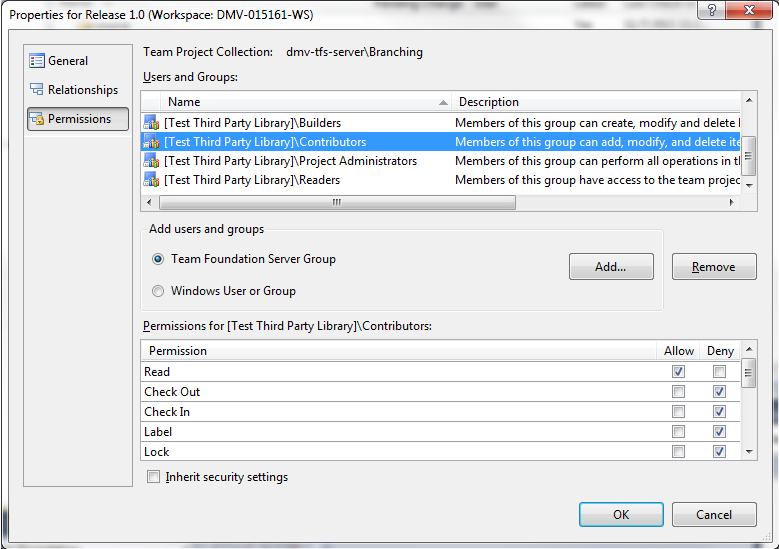
This newly created "Release 1.0" branch needs to be made read-only. To do that, right-click on the branch, choose "Properties", and select the "Permissions" tab. In the top "Users and Groups" section, choose "Contributers". Uncheck the "Inherit security settings" checkbox, and then check "Allow" for the "Read" permission, and "Deny" for all of the others. It should look like this:
Congratulations! You've just finished the process of creating a basic release. Next, we're going to make an enhancement to it and release it as a customized release.
To start off the enhancement process, merge from the Release 1.0 branch down into the Enhancement branch. Ideally, there should be nothing to merge because these two branches should contain the exact same code. However, this is good practice in case someone, somewhere broke process and made a change directly to Release 1.0 (note that they would have had to first change the permissions in order to do so). Do this using the "Branching and Merging" menu, just like before.
At this point, check out the code from the Enhancement branch and make the changes you want. Once everything has been completed and tested to your satisfaction, check it back into the Enhancement branch.
Once this is done, create a new release branch called "Custom Release 1.1" from the Enhancement branch and make it read-only. Make sure you create this new branch in the "Releases" folder.
The final step is to merge the new changes down into the Main branch. To this by right-clicking on the Enhancement branch and merging it into the Main branch.
That completes the Third Party pattern. In Part III, I'll cover our End-User pattern.
Here is a slideshow that covers the information in this article:
No comments:
Post a Comment