Monday, January 20, 2014

Listicle

Have you ever wanted to use something like Pinterest, but felt out of place? Kind of like that "single-dad-hanging-out-with-soccer-moms" out of place? If you think the idea of keeping and sharing lists of stuff that interests you is a good idea, but you're looking for a more professional site, Listicle might interest you. In many ways, Listicle seems better thought out than something like Pinterest, in that it has more customization options and is less targeted to one particular demographic.

Starting with your profile, I like that you can connect with a large variety of social networking sites (Facebook, Twitter, LinkedIn, Reddit, Google+, Instagram, Pinterest, Tumblr, Youtube, and Vimeo). But the nice thing is, you don't have to connect to any of them if you don't want to. Thank you for that, because I hate it when sites require you to login with Facebook or Google. I like to keep my world separate sometimes...

Creating lists in Listicle is pretty satisfying. I can pick different types of lists (plain, numbered, or a countdown). Then I can pick four types of presentations for it (list, slideshow, flipbook, and grid). Also, all lists have 5 major categories to choose from when you create them (photos, videos, links, text, and audio. There is also a list of around 25 categories to place your list under. All in all, I like the customization options, because not all lists are created equal (if you don't agree, perhaps you're not OCD enough!). There are enough options to offer a large variety of lists. You can even upload your own cover photo for your lists, and control permissions for who can see them, which is a nice bonus.

I started out by creating a list of interesting future technologies that science is working on. While exploring the site, I also came across some interesting lists that others had created:

I like that someone is catering to those of us that like to make, use, and share lists, without feeling out of place by being surrounded by crafting, making kids lunches, and fashion. Us geeks need an obsessive list-making outlet too, and I'm glad someone is providing!

Wednesday, February 6, 2013

Adding Metadata to Generated Classes

If you work with generated classes at all, especially with frameworks like Entity Framework, you've inevitably faced the issue of putting metadata on a generated class. This is easier to do than you might think. For example, let's say you have the following generated class:

1:  public partial class GeneratedClass  
2:  {  
3:     // some code here  
4:  }  

If your generated class is a partial class and you're trying to add class-level metadata, simply create another partial class and add the property as follows:

1:  [MyClassMetadata]  
2:  public partial class GeneratedClass  
3:  {  
4:  }  


On the other hand, if you want to add metadata to a property, you can use the MetadataType attribute as follows. Again, create a second partial class to do this.

1:  [MetadataType(typeof(GeneratedClassValidation))]  
2:  public partial class GeneratedClass()  
3:  {  
4:  }  
5:  public class GeneratedClassValidation  
6:  {  
7:     [MyPropertyAttribute]  
8:     public string MyProperty { get; set; }  
9:  }  

Wednesday, October 17, 2012

Compiling Moles Projects After VS2010 SP1 Update

If you have a Visual Studio 2010 project that uses the Moles framework, you may be getting an error similar to this when you try to compile:

The type or namespace name 'XXXXXXXXXXX' does not exist in the namespace 'YYYYYYYYYY' (are you missing an assembly reference?)

This is due to the fact that Windows stores the assembly that you have moled in two different places. The SP1 update for Visual Studio 2010 updated one of these assemblies, but not the other. The simplest fix is to replace the old assembly with a copy of the new assembly (make a backup first).

The old assembly should be in:

"C:\Program Files (x86)\Reference Assemblies\Microsoft\Framework\.NETFramework\v4.0"

While the new assembly should be in:

C:\Windows\Microsoft.NET\Framework64\v4.0.30319


Tuesday, November 29, 2011

Fixing Stuck Builds in TFS 2010

Sometimes builds will get stuck in TFS 2010 and no build with a priority of "Normal" will build. You'll find that you have to change to priority to something higher in order to actually trigger the build. This usually happens because of an unhandled build failure on a build with "Normal" priority. TFS thinks there is another "Normal" build ahead in the queue, and therefore holds off on building your new request.

So how do you fix it? This requires going into the database. Open that database for the collection that is having the problem and look in the tbl_BuildQueue table. Check the Status column in this table. Anything with a "2" means it is still queued (and therefore blocking any new builds). Change these to a "16", which means "Cancelled". That should fix your problem!

Monday, November 21, 2011

Set Image as Wallpaper in Google Chrome

I love Google Chrome. It's my go-to browser, whether I'm on a Windows or a Mac OS X system. But there's one thing that annoys me about it: there's no way to set an image as a desktop background. IE does it. Firefox does it. Why doesn't Chrome? Well, because Google says that this is a rarely used feature and therefore they don't plan to ever support it. Google, you're wrong.

Fortunately, there's a simple workaround. Just go get the "Set Image as Background" Chrome extension. It's free and works great. When you right-click on an image, you simply get a new menu option that says "Set image as wallpaper". It's that easy. The only downside is that it only works on Windows, though I hear that Mac and Linux versions are in the works.

Tuesday, November 15, 2011

Branching in TFS 2010: Part V (Sharing Common Libraries)


In the previous four parts of this article (start with Part I here), I covered the theory behind branching and the three main patterns that use in our projects. The only detail to wrap up is how to share common library code between projects. We do this with a combination of build events and branching. Note that this method only works if both projects are in the same collection. You can't branch between two projects if they are in separate collections. So plan accordingly.


Sharing Common Code
In order to share common code, we need to take care of a few preliminaries first. The common library project needs to contain a "Deploy" folder that contains the final binary assembly. This assembly will be stored in the TFS source control repository. We'll make use of pre-build and post-build events to help automate the process of keeping this assembly up-to-date. Then, each End-User project will have a "Lib" folder. When a project needs a common assembly, we will branch from the "Deploy" folder of a particular release branch into the "Lib" folder of the referencing project. TFS keeps track of all this in the file history, so we can see who branched what assembly to what project and when. This is also handy when something needs to be rolled back.

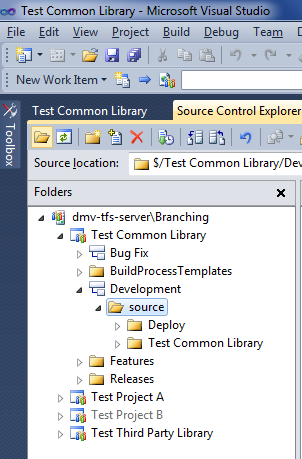
This is how the folder structure looks for the common library, showing the "Deploy" folder:


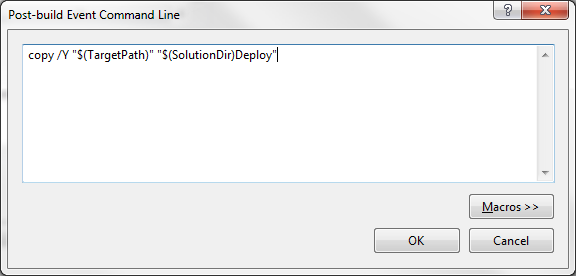
Once the folder structure is set up, the build events need to be set up. Right-click on the project and choose "Properties". In the Properties window, select the "Build Events" tab. In the "Post-build event command line:" box, enter the following:
copy /Y "$(TargetPath)" "$(SolutionDir)Deploy"
It looks like this:


Make sure you have the "Deploy" folder created, and then build the solution once and make sure it copies the assembly correctly. If not, check your paths and make sure everything is in the right place. Once you get it built, create a solution folder in your solution, and add assembly into it. This will ensure that the assembly gets stored in TFS. Then check everything in.

Now at this point, if you try to build again it will fail because the assembly in the "Deploy" folder is read-only, since it's stored in TFS and checked in. One solution is to remember to check out the assembly each time before you build, but honestly....who wants to do that? Instead, we can automate that task, too.

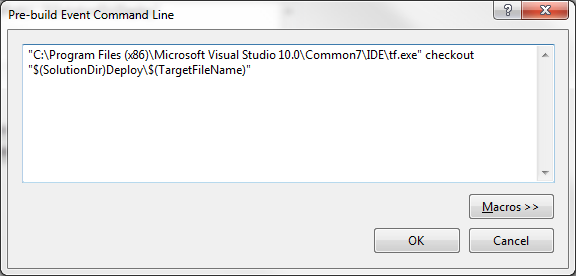
For this, we're going to use a pre-build event. Into the "Pre-build event command line:" box, enter the following:

For 64-bit Windows, use:
"C:\Program Files (x86)\Microsoft Visual Studio 10.0\Common7\IDE\tf.exe" checkout "$(SolutionDir)Deploy\$(TargetFileName)"

For 32-bit Windows, use:
"C:\Program Files\Microsoft Visual Studio 10.0\Common7\IDE\tf.exe" checkout "$(SolutionDir)Deploy\$(TargetFileName)"
It should look like this (this screenshot is from the 64-bit version):


This pre-build event will now check out the assembly from TFS before each build, which will allow the post-build event to copy over it after the build is done. It's still up to you to remember to check it in once you're finished.

This is all that's needed on the common library side of things. You do your releases as I've described in the previous parts of this article, and each release branch will then contain the "Deploy" folder with the binary assembly.

On the other side, make sure each project that needs a reference has a "Lib" folder in its solution and references all shared libraries from there. All that's left now is to get the assembly from the "Deploy" folder of the common library project to the "Lib" folder of the End-User project.

Note that you can put your "Lib" folder at the project level, or at the solution level. The choice is yours. Putting it at the solution level will keep you from having duplicate assemblies in each project's separate "Lib" folder. On the other hand, having a "Lib" folder per project gives you the added flexibility of allowing you to have a different version of the same assembly for each project. You need to decide which approach works best for your needs.

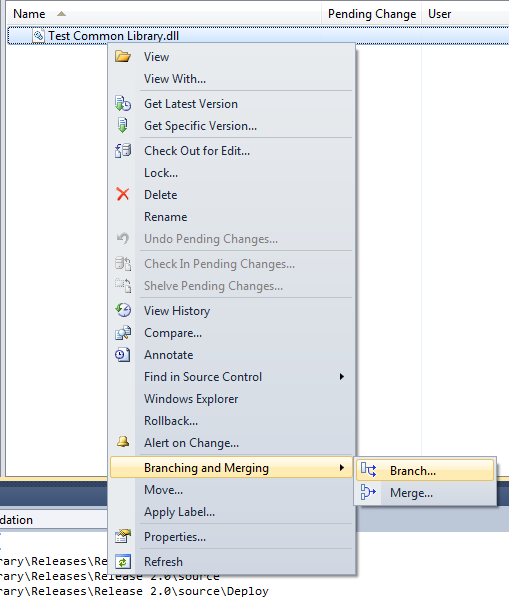
Once the "Lib" folder is set up, the only thing left is to branch a specific version of the common library into that "Lib" folder. Do that by right-clicking on the actual assembly (the .dll file) from the "Deploy" folder of a particular release, and branching it into the "Lib" folder of the other project.


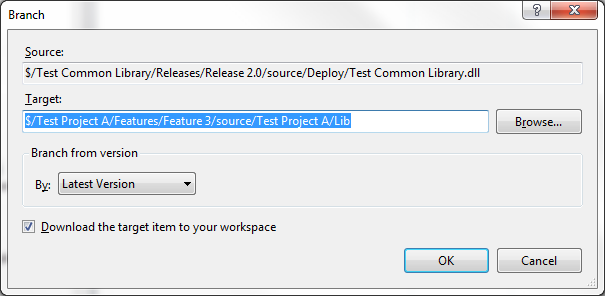
Note below that the Source and Target are two different projects. This is the key to this type of sharing.


This method of sharing is superior to simply copying the assemblies manually as needed, because it allows tracking and rolling back of changes through TFS. The version history of the files will show what projects a specific assembly has been branched into, and what versions of various assemblies are included in a given project.

Here is a slideshow that contains the information in this article:
That concludes my overview of branching and sharing code in TFS. I hope it is useful, and feel free to leave feedback on how I can improve this, or future, articles.

Sunday, November 13, 2011

iCloud Photo Stream


Photo Stream is one of the many iCloud services available for iOS devices, as well as for Windows, Mac OS X, and even Apple TV. The idea behind Photo Stream is that pictures you take on any of your devices are shared, via iCloud, to all of your other devices. Simple, and useful, enough. However, here are seven things you may not know about iCloud Photo Stream:
  1. On iOS devices, photos are uploaded as soon as you leave the Camera app, as long as you are on wifi. Photos will not be uploaded over a cellular connection.
  2. Photos are only stored on iCloud for 30 days. Normally this is plenty of time for each of your devices to download the photo. But if this is a problem based on your usage patterns, make sure each device is connected to wifi at least once every 30 days.
  3. iOS devices are limited to the last 1000 photos in the Photo Stream. Mac and Windows systems will keep all photos, however.
  4. While Mac and Windows systems keep the native resolution of the photo, iOS devices may resize to photos to a resolution optimized for the specific device.
  5. Photo Stream does not support videos.
  6. Photo Stream photos do not count toward your iCloud storage limit.
  7. You cannot delete individual photos from the Photo Stream, only all of them at once. Doing so will not delete the photos from the individual devices.