Sometimes builds will get stuck in TFS 2010 and no build with a priority of "Normal" will build. You'll find that you have to change to priority to something higher in order to actually trigger the build. This usually happens because of an unhandled build failure on a build with "Normal" priority. TFS thinks there is another "Normal" build ahead in the queue, and therefore holds off on building your new request.
So how do you fix it? This requires going into the database. Open that database for the collection that is having the problem and look in the tbl_BuildQueue table. Check the Status column in this table. Anything with a "2" means it is still queued (and therefore blocking any new builds). Change these to a "16", which means "Cancelled". That should fix your problem!

Tuesday, November 29, 2011
Monday, November 21, 2011
Set Image as Wallpaper in Google Chrome
Fortunately, there's a simple workaround. Just go get the "Set Image as Background" Chrome extension. It's free and works great. When you right-click on an image, you simply get a new menu option that says "Set image as wallpaper". It's that easy. The only downside is that it only works on Windows, though I hear that Mac and Linux versions are in the works.
Tuesday, November 15, 2011
Branching in TFS 2010: Part V (Sharing Common Libraries)
In the previous four parts of this article (start with Part I here), I covered the theory behind branching and the three main patterns that use in our projects. The only detail to wrap up is how to share common library code between projects. We do this with a combination of build events and branching. Note that this method only works if both projects are in the same collection. You can't branch between two projects if they are in separate collections. So plan accordingly.
Sharing Common Code
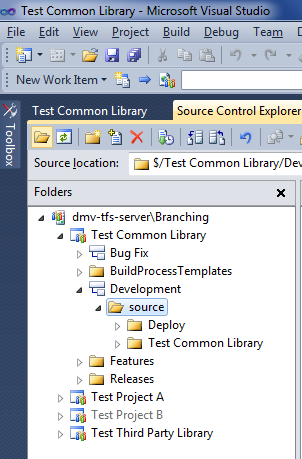
In order to share common code, we need to take care of a few preliminaries first. The common library project needs to contain a "Deploy" folder that contains the final binary assembly. This assembly will be stored in the TFS source control repository. We'll make use of pre-build and post-build events to help automate the process of keeping this assembly up-to-date. Then, each End-User project will have a "Lib" folder. When a project needs a common assembly, we will branch from the "Deploy" folder of a particular release branch into the "Lib" folder of the referencing project. TFS keeps track of all this in the file history, so we can see who branched what assembly to what project and when. This is also handy when something needs to be rolled back.
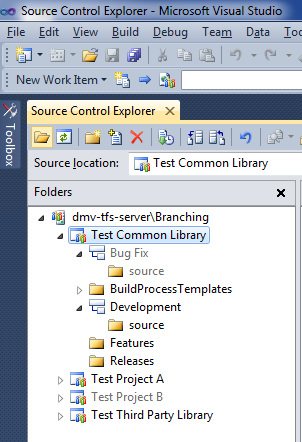
This is how the folder structure looks for the common library, showing the "Deploy" folder:
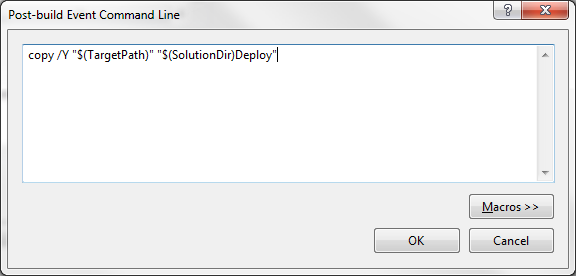
Once the folder structure is set up, the build events need to be set up. Right-click on the project and choose "Properties". In the Properties window, select the "Build Events" tab. In the "Post-build event command line:" box, enter the following:
copy /Y "$(TargetPath)" "$(SolutionDir)Deploy"It looks like this:
Make sure you have the "Deploy" folder created, and then build the solution once and make sure it copies the assembly correctly. If not, check your paths and make sure everything is in the right place. Once you get it built, create a solution folder in your solution, and add assembly into it. This will ensure that the assembly gets stored in TFS. Then check everything in.
Now at this point, if you try to build again it will fail because the assembly in the "Deploy" folder is read-only, since it's stored in TFS and checked in. One solution is to remember to check out the assembly each time before you build, but honestly....who wants to do that? Instead, we can automate that task, too.
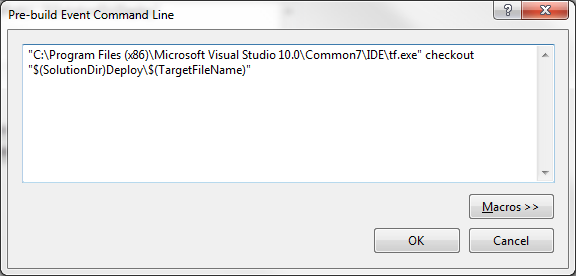
For this, we're going to use a pre-build event. Into the "Pre-build event command line:" box, enter the following:
For 64-bit Windows, use:
"C:\Program Files (x86)\Microsoft Visual Studio 10.0\Common7\IDE\tf.exe" checkout "$(SolutionDir)Deploy\$(TargetFileName)"
For 32-bit Windows, use:
"C:\Program Files\Microsoft Visual Studio 10.0\Common7\IDE\tf.exe" checkout "$(SolutionDir)Deploy\$(TargetFileName)"
It should look like this (this screenshot is from the 64-bit version):
This pre-build event will now check out the assembly from TFS before each build, which will allow the post-build event to copy over it after the build is done. It's still up to you to remember to check it in once you're finished.
This is all that's needed on the common library side of things. You do your releases as I've described in the previous parts of this article, and each release branch will then contain the "Deploy" folder with the binary assembly.
On the other side, make sure each project that needs a reference has a "Lib" folder in its solution and references all shared libraries from there. All that's left now is to get the assembly from the "Deploy" folder of the common library project to the "Lib" folder of the End-User project.
Note that you can put your "Lib" folder at the project level, or at the solution level. The choice is yours. Putting it at the solution level will keep you from having duplicate assemblies in each project's separate "Lib" folder. On the other hand, having a "Lib" folder per project gives you the added flexibility of allowing you to have a different version of the same assembly for each project. You need to decide which approach works best for your needs.
Once the "Lib" folder is set up, the only thing left is to branch a specific version of the common library into that "Lib" folder. Do that by right-clicking on the actual assembly (the .dll file) from the "Deploy" folder of a particular release, and branching it into the "Lib" folder of the other project.
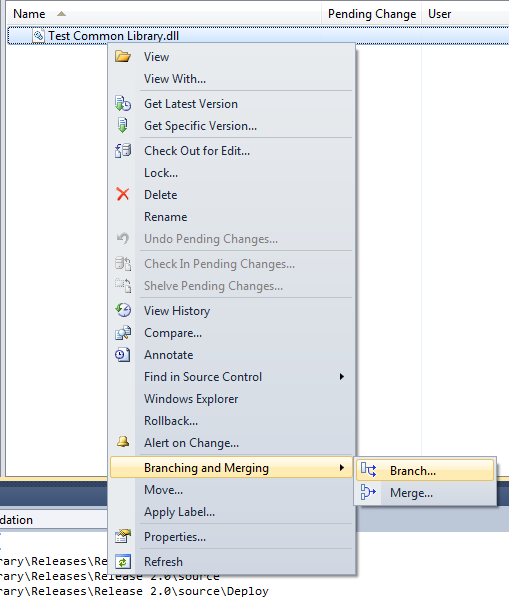
Note below that the Source and Target are two different projects. This is the key to this type of sharing.
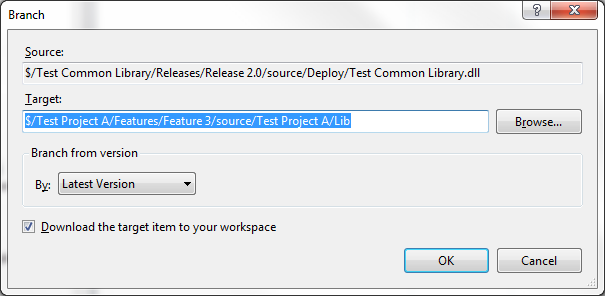
This method of sharing is superior to simply copying the assemblies manually as needed, because it allows tracking and rolling back of changes through TFS. The version history of the files will show what projects a specific assembly has been branched into, and what versions of various assemblies are included in a given project.
Here is a slideshow that contains the information in this article:
That concludes my overview of branching and sharing code in TFS. I hope it is useful, and feel free to leave feedback on how I can improve this, or future, articles.
Sunday, November 13, 2011
iCloud Photo Stream

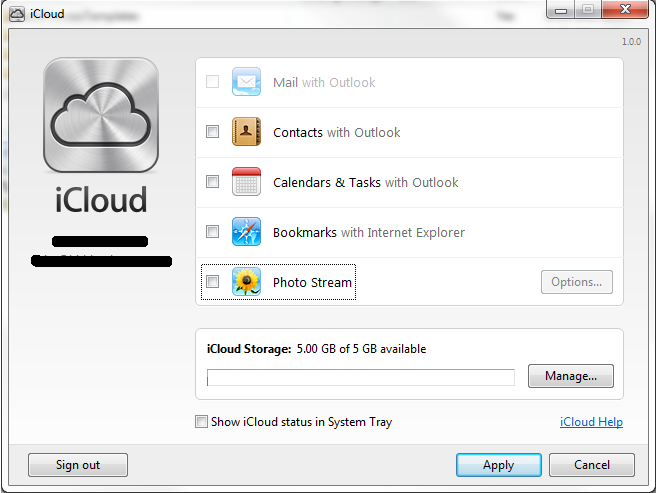
Photo Stream is one of the many iCloud services available for iOS devices, as well as for Windows, Mac OS X, and even Apple TV. The idea behind Photo Stream is that pictures you take on any of your devices are shared, via iCloud, to all of your other devices. Simple, and useful, enough. However, here are seven things you may not know about iCloud Photo Stream:
- On iOS devices, photos are uploaded as soon as you leave the Camera app, as long as you are on wifi. Photos will not be uploaded over a cellular connection.
- Photos are only stored on iCloud for 30 days. Normally this is plenty of time for each of your devices to download the photo. But if this is a problem based on your usage patterns, make sure each device is connected to wifi at least once every 30 days.
- iOS devices are limited to the last 1000 photos in the Photo Stream. Mac and Windows systems will keep all photos, however.
- While Mac and Windows systems keep the native resolution of the photo, iOS devices may resize to photos to a resolution optimized for the specific device.
- Photo Stream does not support videos.
- Photo Stream photos do not count toward your iCloud storage limit.
- You cannot delete individual photos from the Photo Stream, only all of them at once. Doing so will not delete the photos from the individual devices.
Friday, November 11, 2011

Wednesday, November 9, 2011
Branching in TFS 2010: Part IV (Internal Pattern)
In Part III of this article, I discussed the End-User branching pattern and how to create it in TFS 2010. In this part, I'll be talking about the Internal pattern. The End-User pattern was a hybrid of the Branch by Quality pattern and the Branch by Feature pattern. The Internal pattern is also a hybrid of the same two patterns, but a somewhat different hybrid to meet the specific needs of the Internal projects.
Internal Projects
What we call Internal projects are those that are never directly used by customers. The most common example of an Internal project is a common library that is shared by multiple End-User projects. As a result, there can be multiple different versions of an Internal project in production at any given time. Another key difference between End-User and Internal projects is that Internal projects do not go through a formalized testing process like UAT. In some ways the Internal pattern is simpler than the End-User pattern, but in other ways it's more complex.
The Internal branching pattern looks like this (click for a larger view):

This pattern only has two main branches, Development and Bug Fix. Development is the main branch where all day-to-day coding occurs. Bug Fix is used for coding bug fixes to released code, and also as a staging ground for production releases.
The first step is to create the folder and branching structure. This is done just like in Part III, except for the obvious changes in the number of branches. It should look like this when done:
The branching hierarchy is quite simple, like this:
 That completes the basic set up. There are four main processes that can happen during an Internal project:
 The next part, a Major Release, is slightly different. It looks like this:


Internal Projects
What we call Internal projects are those that are never directly used by customers. The most common example of an Internal project is a common library that is shared by multiple End-User projects. As a result, there can be multiple different versions of an Internal project in production at any given time. Another key difference between End-User and Internal projects is that Internal projects do not go through a formalized testing process like UAT. In some ways the Internal pattern is simpler than the End-User pattern, but in other ways it's more complex.
The Internal branching pattern looks like this (click for a larger view):
This pattern only has two main branches, Development and Bug Fix. Development is the main branch where all day-to-day coding occurs. Bug Fix is used for coding bug fixes to released code, and also as a staging ground for production releases.
The first step is to create the folder and branching structure. This is done just like in Part III, except for the obvious changes in the number of branches. It should look like this when done:
The branching hierarchy is quite simple, like this:
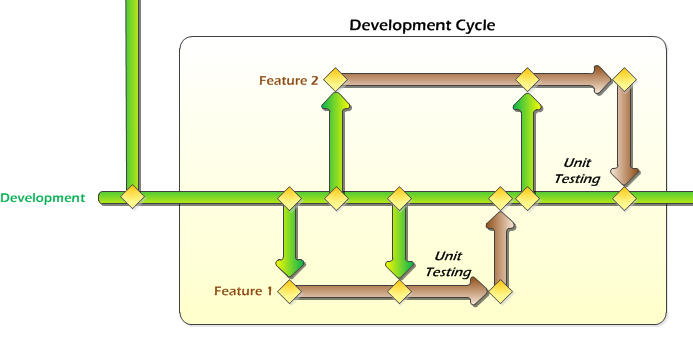
- Development Cycle
- Major Release
- Incremental Release of the Latest Version (bug fix to the latest released version)
- Incremental Release of an Old Version (bug fix to an older released version)
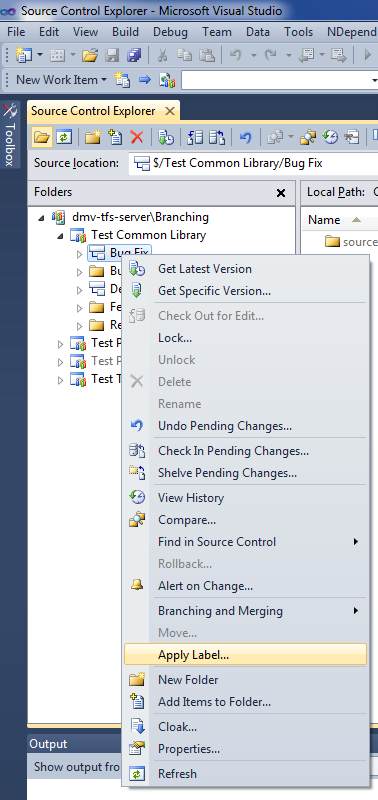
The biggest difference here compared to what we've done before is the presence of the label. The label comes in handy for making bug fixes to older releases, as we'll see in a little bit. To apply the label, right-click on the Bug Fix branch and choose "Apply Label...":
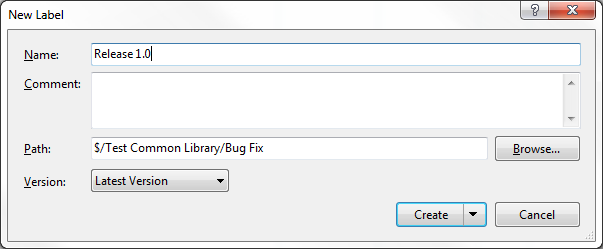
After that, give the label a meaningful name, like "Release 1.0":
Finally, create a read-only branch for the release, just like before. That's all there is to it for a Major Release.
An Incremental Release is similar, except the bug fix coding is done in the Bug Fix branch, and not in the Development branch. And just like with the Major Release, don't forget to label the code in the Bug Fix branch.
The only other thing left is an Incremental Release, and this is where we'll finally make use of the labels we've been creating. So far up to this point, we've released version 1.0 and a subsequent version 1.1, which contained a bug fix to 1.0. Let's say that now we have a bug in 1.0 that needs to be fixed, but we don't want that fix to be incorporated into 1.1. This is how you do it.
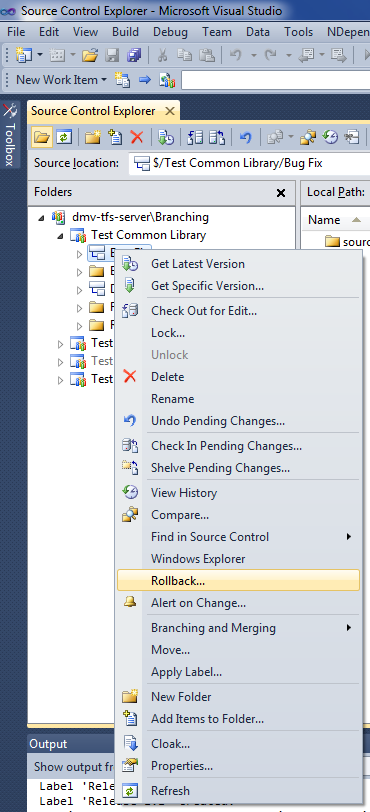
First, rollback the code in the Bug Fix branch to Label 1.0. Do this by right-clicking on the Bug Fix branch, and selecting "Rollback..."
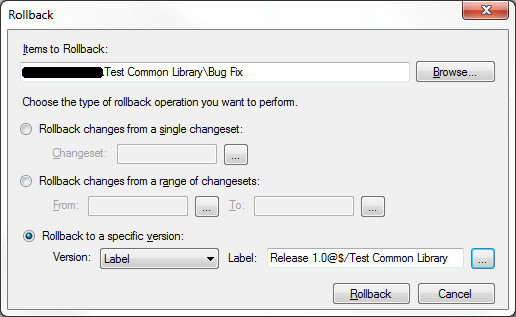
Then make sure you choose the correct label in the correct project (by default Visual Studio searches labels in all projects, not just the current one).
Once this is done, all the code in the Bug Fix branch has been reset back to the Release 1.0 state. At this point, follow the same procedures as a normal Incremental Release - make your bug fix code changes, test them, and release them into production as Release 1.0.1. Also, merge your changes back down to the Development branch if you want - this step is optional. Note that Development contains 1.1 (or possibly later, unreleased) code. If you want this bug fix incorporated into those version, merge your changes down to Development. For example, if you didn't want this bug fix in 1.1 for some reason, but do want it to appear in a future 2.0 release, go ahead and merge. If you don't, and this bug fix is solely intended for Release 1.0, then don't merge your changes down to Development.
The final step is to rollback the code in the Bug Fix branch (which currently contains 1.0.1) to 1.1. This will ensure that the Bug Fix branch is always left in the state containing the latest released code. Doing this will simplify future releases, both Major and Incremental.
That completes an overview of all the major tasks involved with Internal projects. In the next part, I'll finish up with explaining how to share these common Internal projects across multiple End-User projects.
Here's a slideshow that covers the information in this article:
iCloud Control Panel for Windows
Tuesday, November 8, 2011
Branching in TFS 2010: Part III (End-User Pattern)
In Part II of this article, I discussed the Third Party branching pattern and how to create it in TFS 2010. In this part, I'll be talking about the End-User pattern. Whereas the Third Party pattern was a variation of the Branch by Release pattern, the End-User pattern is a hybrid between Branch by Feature and Branch by Quality.
End-User Projects
What we call End-User Projects are typically web applications. This means that only a single version is ever in production at a time, and each of these goes through customer UAT before being deployed into production. Therefore, we needed the ability to promote the code through various quality stages. But given the complexity of some of the applications, we also wanted to incorporate feature branching. This was accomplished using the following model (click on the image for a larger view):
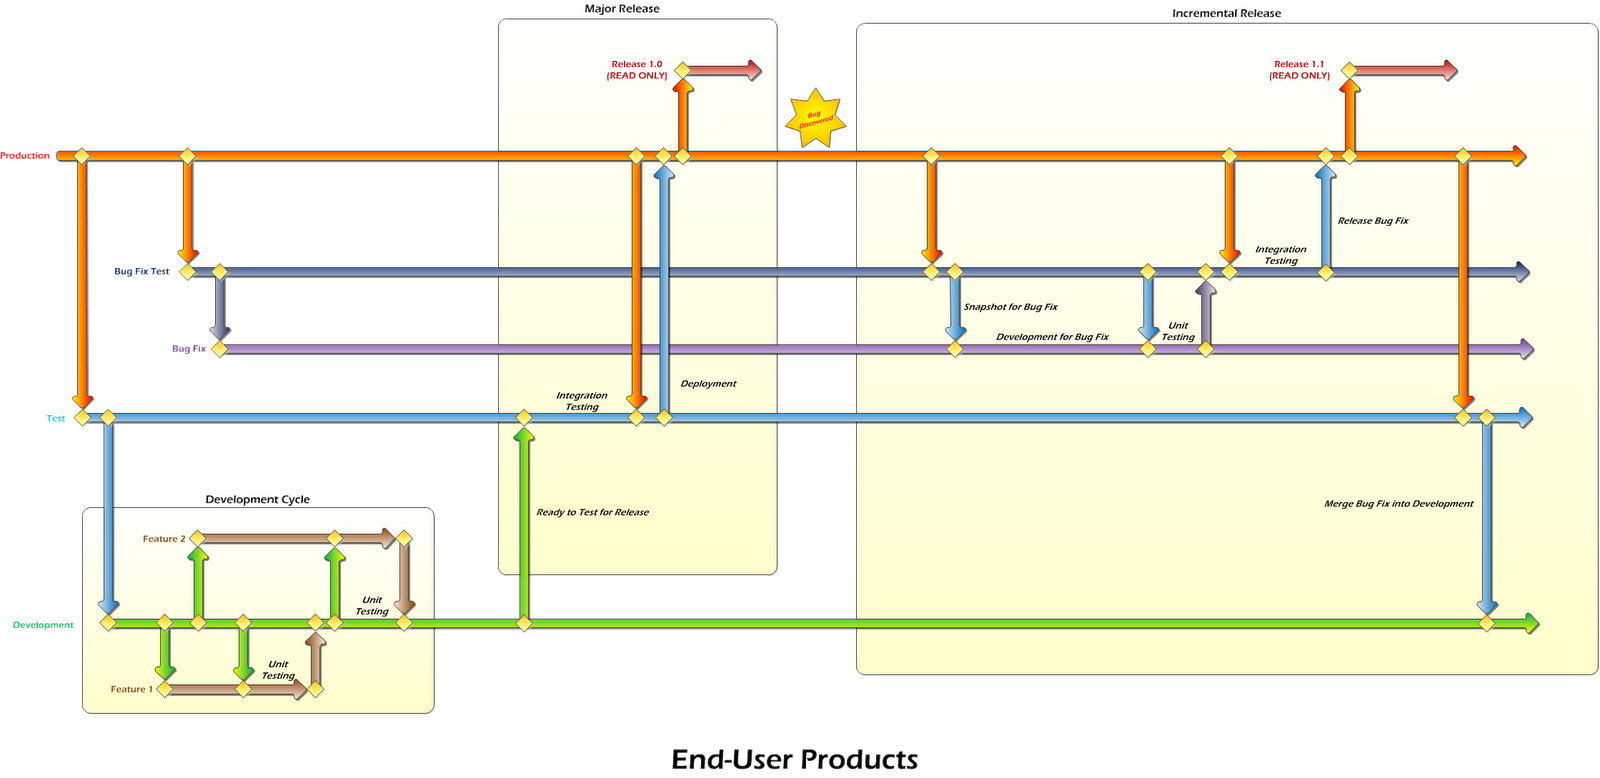
This pattern consists of 5 primary branches:

Initially, this pattern will keep feature development independent. I say "initially" because it won't stay that way for the entire life of the project. This isn't necessarily a big deal, but it is important to be aware of it. While each feature is being developed, neither is "aware" of the other. After Feature 1 is merged into the Development branch, upon completion, then it becomes part of the mainline code. As soon Development is merged into the Feature 2 branch just prior to unit testing Feature 2, the Feature 2 branch will contain Feature 1. After this point there is no easy way to go back to a purely-Feature 2 branch. Normally this is okay and not a problem. If for some reason you need to revert, you can rollback the changeset from the merge operation.
Once all of the features have been completed, unit tested, and merged into the Development branch, it's time for a deployment.
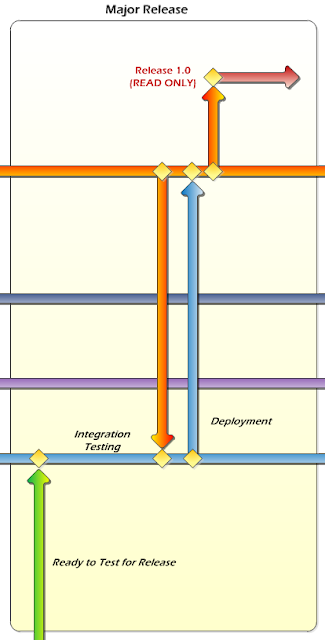
As you can see, the first step is to promote the code from Development to Test by merging the Development branch into the Test branch (and checking in the Test code afterward). After that, integration testing is performed on the code in the Test branch. Once that is done, merge code down from Production to Test, to make sure any potential conflicts are resolved. You might want to do additional testing at this point, too. After that, merge the code in the Test branch into Production (and check in). Finally, create a read-only branch from Production for the release. The process for doing this is the same as in Part II.
Now let's say after Release 1.0 has been deployed, we discover a bug in production that needs to be fixed right away and can't wait until the 2.0 release. No problem!
Here are the steps for creating an incremental bug fix release:
Here's a slideshow that covers the information in this article:
End-User Projects
What we call End-User Projects are typically web applications. This means that only a single version is ever in production at a time, and each of these goes through customer UAT before being deployed into production. Therefore, we needed the ability to promote the code through various quality stages. But given the complexity of some of the applications, we also wanted to incorporate feature branching. This was accomplished using the following model (click on the image for a larger view):
This pattern consists of 5 primary branches:
- Production - this is the top of the hierarchy, as all branches are child branches or below of this one. The code in here represents "production ready" code which is ready to be deployed. Typically code in the Production branch is released immediately after merging into this branch.
- Test - the Test branch represents release testing, meaning code testing prior to its release. This is to be distinguished from testing bug fixes to code that is already in production.
- Development - this is the main branch, and where almost all development occurs. It contains the latest code with the most up-to-date feature set.
- Bug Fix Test - this branch is used for testing bug fix releases. Normal deployments from Development to Production will never pass through this branch.
- Bug Fix - the Bug Fix branch is the development branch for coding bug fixes. This has to be distinctly different from the Development branch because new code in the Development branch shouldn't be merged into production along with a bug fix. Without this branch (and Bug Fix Test), there would need to be a code freeze while fixing bugs, and that's a cardinal no-no in the world of branching.
In addition to the above five branches, there are individual feature branches off the Development branch. There is also an individual read-only branch for each release, which are branched off the Production branch.
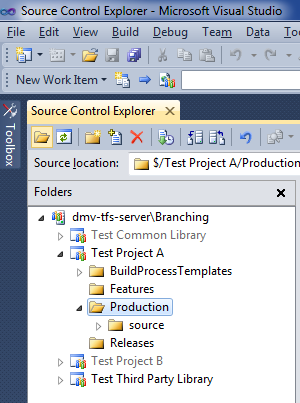
In order to create this pattern in TFS, we first create the folder structure. The structure is similar to what was in Part II, with the addition of a Features folder. It should look like this when completed:
Once the basic folder structure is created, it's time to create the branches.
- First, convert the Production folder to a branch.
- Branch the Production branch into a Test branch and place it in the root folder.
- Branch Test into a Development branch and place it in the root folder.
- Branch Production into a Bug Fix Test branch and place it in the root folder.
- Branch Bug Fix Test into a Bug Fix branch and place it in the root folder.
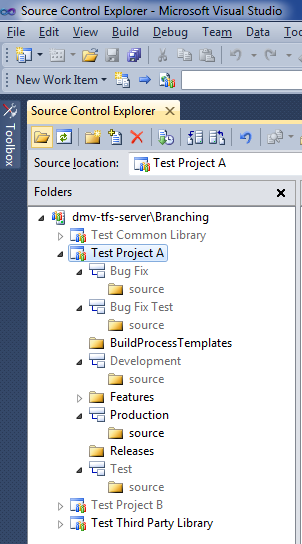
When you're done, it should look like this:
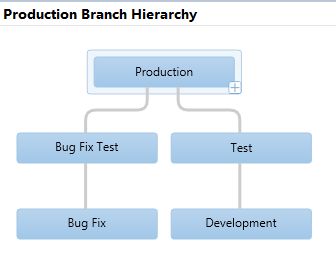
The branch hierarchy should look as follows (you can view this by right-clicking on the Production branch, going to "Branching and Merging" and choosing "View Hierarchy"):
Finally, check in your project code into the "source" folder of the Development branch. This can simply be an empty project at this point.
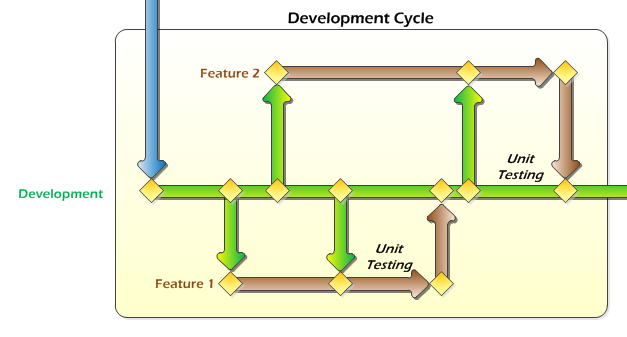
Now that the basic branch structure is all set up, I'll go through a typical development process including feature development, testing, deployment, and bug fixes. Let's start with the development cycle, which is entirely contained to the Development branch and its child Feature branches:
To create these branches:
- Branch Development into a "Feature 1" branch, located in the "Features" folder.
- Branch Development into a "Feature 2" branch, also in the "Features" folder.
It should look as follows:
Once all of the features have been completed, unit tested, and merged into the Development branch, it's time for a deployment.
As you can see, the first step is to promote the code from Development to Test by merging the Development branch into the Test branch (and checking in the Test code afterward). After that, integration testing is performed on the code in the Test branch. Once that is done, merge code down from Production to Test, to make sure any potential conflicts are resolved. You might want to do additional testing at this point, too. After that, merge the code in the Test branch into Production (and check in). Finally, create a read-only branch from Production for the release. The process for doing this is the same as in Part II.
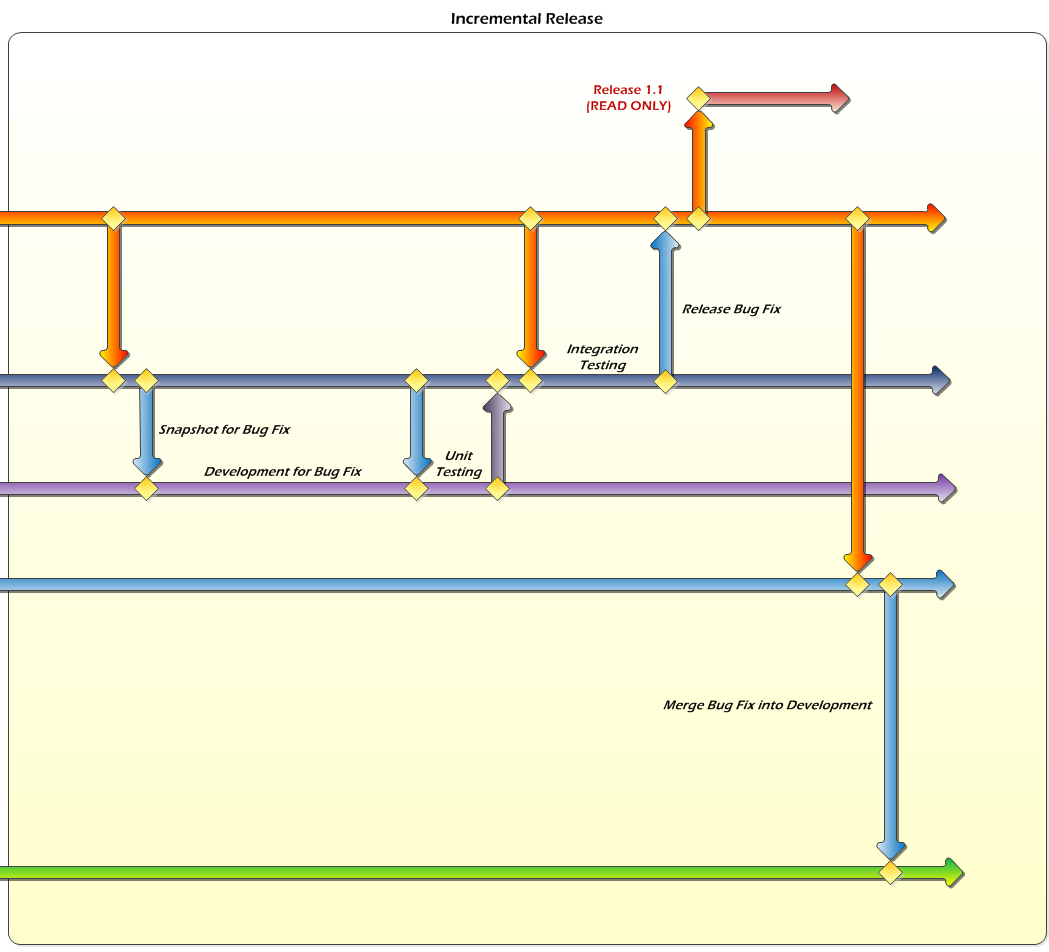
Now let's say after Release 1.0 has been deployed, we discover a bug in production that needs to be fixed right away and can't wait until the 2.0 release. No problem!
Here are the steps for creating an incremental bug fix release:
- Merge code from Production to Bug Fix Test.
- Check in Bug Fix Test code.
- Merge code from Bug Fix Test to Bug Fix.
- Check in Bug Fix code.
- Code the bug fix in the Bug Fix branch.
- Merge code from Bug Fix Test to Bug Fix prior to unit testing (in case any other bug fixes were going on at the same time).
- Unit test the bug fix code in Bug Fix.
- Merge code from Bug Fix to Bug Fix Test.
- Check in Bug Fix Test code.
- Merge code from Production to Bug Fix Test (in case any other bug fixes were deployed while this one was being worked on).
- Perform integration testing of the bug fix code in Bug Fix Text.
- Merge code from Bug Fix Test to Production.
- Check in Production code.
- Create a read-only branch from Production for the incremental release.
- Now we need to merge the bug fix into our mainline code. Merge the Production code into the Test branch.
- Check in Test code.
- Finally, merge the code from Test down into Development.
- And, of course, don't forget to check in the Development code.
That completes an overview of all the major tasks involved with End-User projects. In the next part, I'll cover the Internal project pattern.
Monday, November 7, 2011
Branching in TFS 2010: Part II (Third Party Pattern)
In Part I of this article, I discussed the theory behind branching, some key points to keep in mind, and several of the most popular branching patterns. In this part, I'll be talking about the specific patterns we use on our team and how to actually implement those patterns in TFS 2010.
On our team, we have three main types of projects. The first is what we call End-User projects. These are web applications and we would only ever have one version running in production at any given time. These projects all require UAT testing by our customers. The second kind of project is what call Internal projects. These are never directly used by end-users, so they never go through UAT. Internal projects are usually things like common class libraries that are shared by several End-User projects. This means that several different versions of an Internal project could be in production at the same time. The third type of project we use are Third-Party projects. These are third-party libraries that we usually don't have the source code for, so they are simply versioned and stored. However, in some cases we will have the source code (open source libraries, jQuery scripts, etc.) and we will make customizations to them. Because of the different requirements for the three types of projects, we needed three different branching patterns.


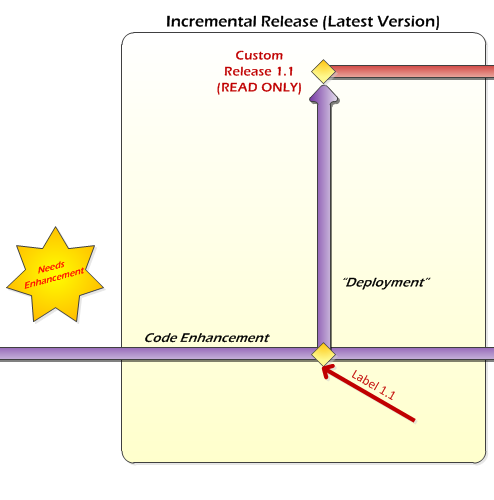


Congratulations! You've just finished the process of creating a basic release. Next, we're going to make an enhancement to it and release it as a customized release.
To start off the enhancement process, merge from the Release 1.0 branch down into the Enhancement branch. Ideally, there should be nothing to merge because these two branches should contain the exact same code. However, this is good practice in case someone, somewhere broke process and made a change directly to Release 1.0 (note that they would have had to first change the permissions in order to do so). Do this using the "Branching and Merging" menu, just like before.
At this point, check out the code from the Enhancement branch and make the changes you want. Once everything has been completed and tested to your satisfaction, check it back into the Enhancement branch.
Once this is done, create a new release branch called "Custom Release 1.1" from the Enhancement branch and make it read-only. Make sure you create this new branch in the "Releases" folder.
The final step is to merge the new changes down into the Main branch. To this by right-clicking on the Enhancement branch and merging it into the Main branch.
That completes the Third Party pattern. In Part III, I'll cover our End-User pattern.
Here is a slideshow that covers the information in this article:
On our team, we have three main types of projects. The first is what we call End-User projects. These are web applications and we would only ever have one version running in production at any given time. These projects all require UAT testing by our customers. The second kind of project is what call Internal projects. These are never directly used by end-users, so they never go through UAT. Internal projects are usually things like common class libraries that are shared by several End-User projects. This means that several different versions of an Internal project could be in production at the same time. The third type of project we use are Third-Party projects. These are third-party libraries that we usually don't have the source code for, so they are simply versioned and stored. However, in some cases we will have the source code (open source libraries, jQuery scripts, etc.) and we will make customizations to them. Because of the different requirements for the three types of projects, we needed three different branching patterns.
Third-Party Projects
I'll cover the Third-Party branching pattern first. In our environment, we have two types of releases when it comes to third party libraries. What we call a third party release, which is simply what is released by the developers of the library and a customized release, which is where we make small custom modifications to the library (usually for jQuery libraries). We don't go through a formal testing phase for either of these, so we just need basic branching support for tracking the releases and allowing for customization. We achieve this by using a variation of the Branch by Release pattern (click the picture for a larger view).
In this pattern, all code is initially checked into the Enhancement branch, then released into individual read-only Release branches from there. Note that these "check ins" are actually complete replacements of the code. So the changeset would consist of a deletion of everything, then the addition of the new files. This can also be handled by two separate changesets. Note that before creating the Release branch, we label the code in the Enhancement branch. This will come in handy later, because we may have to rollback the code in order to enhance an older release.
If we want to customize something, we merge from the Release branch down to the Enhancement branch and make our changes there. Then we release it by creating a new Release branch for the customized version, and finally merge those changes back into our Main branch. Again, don't forget the labels.
If we want to make an enhancement to an older Release (not the latest release), then we have to first rollback the Enhancement branch to the label for that version. Then we make our changes and release as normal, but when we're done we rollback the Enhancement branch back to the latest release version. This ensures that we always leave the Enhancement branch with the latest version.
The other case we have to handle is when we want to propagate enhancements we've made to a later release. First off, be careful when doing this because you never know what may have changed in third-part code from release-to-release. So automatically patching a later release isn't recommended. But assuming you've done your due diligence, this is how you do it.
First, you do your major release of the new version as before. Then you merge the previous release (which contains your enhancements) into the Enhancement branch. After you're satisfied that the result is working, create your new customized release branch. Don't forget to label everything.
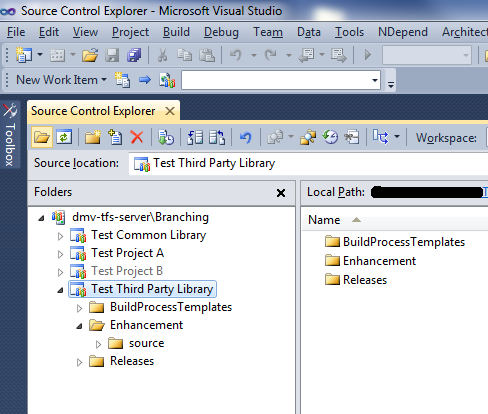
In order to create this in TFS 2010, first create the basic folder structure. The design of the folder structure can vary depending on your needs, but we tend to use something like below. Normally we would also have a "Features" folder, but that doesn't apply for this pattern. It will be used in the the later patterns, though.
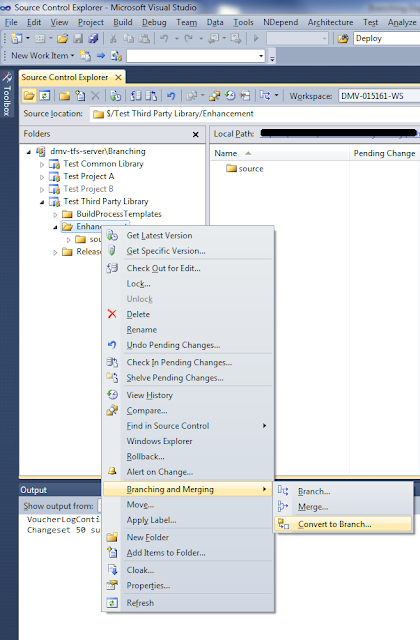
Next, create your project and check it in to the source folder under Enhancement (or just check in the library assemblies). After that, convert the Enhancement folder to a branch. Do this by right-clicking on the folder, then going into the "Branching and Merging" menu.
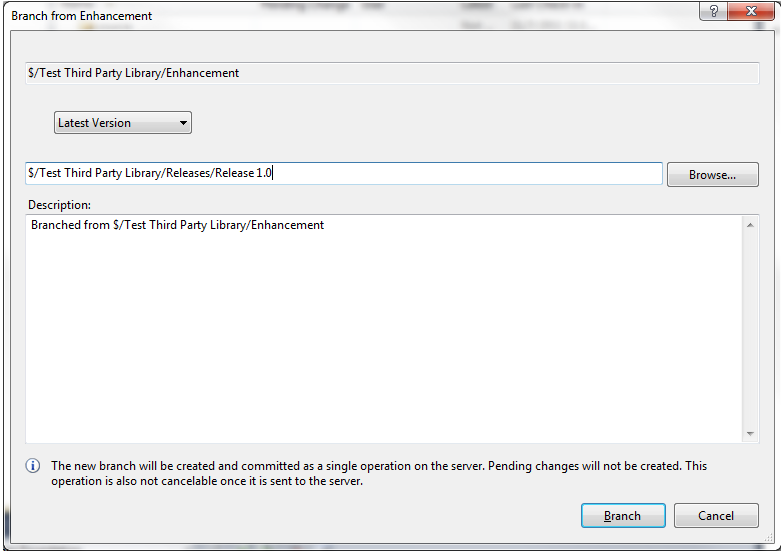
Finally, create a release from the Enhancement branch. Go to the same "Branching and Merging" menu by right-clicking on the Enhancement branch, and choose "Branch..." Fill out the dialog as shown below:
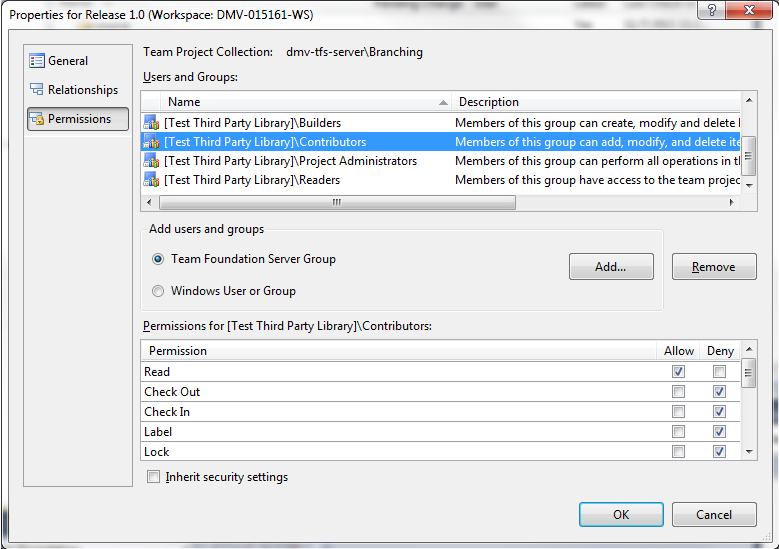
This newly created "Release 1.0" branch needs to be made read-only. To do that, right-click on the branch, choose "Properties", and select the "Permissions" tab. In the top "Users and Groups" section, choose "Contributers". Uncheck the "Inherit security settings" checkbox, and then check "Allow" for the "Read" permission, and "Deny" for all of the others. It should look like this:
Congratulations! You've just finished the process of creating a basic release. Next, we're going to make an enhancement to it and release it as a customized release.
To start off the enhancement process, merge from the Release 1.0 branch down into the Enhancement branch. Ideally, there should be nothing to merge because these two branches should contain the exact same code. However, this is good practice in case someone, somewhere broke process and made a change directly to Release 1.0 (note that they would have had to first change the permissions in order to do so). Do this using the "Branching and Merging" menu, just like before.
At this point, check out the code from the Enhancement branch and make the changes you want. Once everything has been completed and tested to your satisfaction, check it back into the Enhancement branch.
Once this is done, create a new release branch called "Custom Release 1.1" from the Enhancement branch and make it read-only. Make sure you create this new branch in the "Releases" folder.
The final step is to merge the new changes down into the Main branch. To this by right-clicking on the Enhancement branch and merging it into the Main branch.
That completes the Third Party pattern. In Part III, I'll cover our End-User pattern.
Here is a slideshow that covers the information in this article:
Subscribe to:
Posts (Atom)